Proxmox GPU Passthrough to Docker
There has been a lot of changes recently in my homelab, nothing spectacular but nonetheless a change. I was running an old Lenovo S20 with a Xeon Processor and 12 GB of RAM (I had turned off the other machine as it was just using up electricity and not being used at all). Then I decided to upgrade my gaming desktop, which left me with my old gaming machine. This was an I7-2600K and 16 GB of RAM.
I started doing comparison between the Xeon and the I7 and the I7 trumped the Xeon in 99% of areas, so along I went and decided to do a hardware upgrade to my Proxmox server.
Halfway through I started thinking of what I could use my old GTX 780 for on the proxmox instance and I decided to either use it for transcoding in plex or whatever else may come along later on. This is where I started having issues. The motherboard I was going to use (ASUS Sabretooth P67) did not support VT-d which is required for passing through hardware to virtual hosts. Add to that the CPU I had was a K version, and Intel lovingly decided that K models would not have VT-d allowed. So I made some purchases and ended up with an I7-3770 and a DQ77MK motherboard. All the hardware was ready and off I went to switch it all over.
So lets kick off with the actual task at hand, how to get GPU pass through working on an Ubuntu instance.
Pre-Reqs
- Confirm that VT-x and VT-d are enabled in your proxmox host bios.
- I am going to assume you deployed your virtual machine with all the defaults in proxmox (SeaBIOS and i440fx), I say this because many tutorials say you have to use UEFI and q35, which caused a lot of unnecessary work. You do not have to change these settings and can continue with the default config for a Virtual Machine.
Let's Go — Proxmox Prepping
Now that we have that bit done, let's go into our proxmox host and edit /etc/default/grub
vim /etc/default/grubWe are going to edit the line for GRUB_CMDLINE_LINUX_DEFAULT and make it look like this
GRUB_CMDLINE_LINUX_DEFAULT="quiet intel_iommu=on pcie_acs_override=downstream,multifunction video=efifb:eek:ff"Save that and run
update-grubWhen that has completed lets add in some more modules, edit /etc/modules
vim /etc/modulesand add the following
vfio
vfio_iommu_type1
vfio_pci
vfio_virqfd
Save and close the file.
Next step is to add the following
echo "options vfio_iommu_type1 allow_unsafe_interrupts=1" > /etc/modprobe.d/iommu_unsafe_interrupts.conf
echo "options kvm ignore_msrs=1" > /etc/modprobe.d/kvm.conf
and blacklist the drivers in proxmox
echo "blacklist nouveau" >> /etc/modprobe.d/blacklist.conf
echo "blacklist nvidia" >> /etc/modprobe.d/blacklist.conf
We need to configure the GPU for PCIe Pass through
lspci -v
Enter the PCI identifier
lspci -n -s 82:00
Copy the HEX values from your GPU here:
echo "options vfio-pci ids=####.####,####.#### disable_vga=1"> /etc/modprobe.d/vfio.confNow finally run
update-initramfs -iAnd the last one is to reboot the Proxmox host. This should be the last time you need to restart the actual Proxmox host (Fingers Crossed)
Moving along nicely — Adding the GPU to your Ubuntu guest
I have done this next bit through the UI, super simple.
Go the hardware menu for the VM in question and click Add > PCI Device
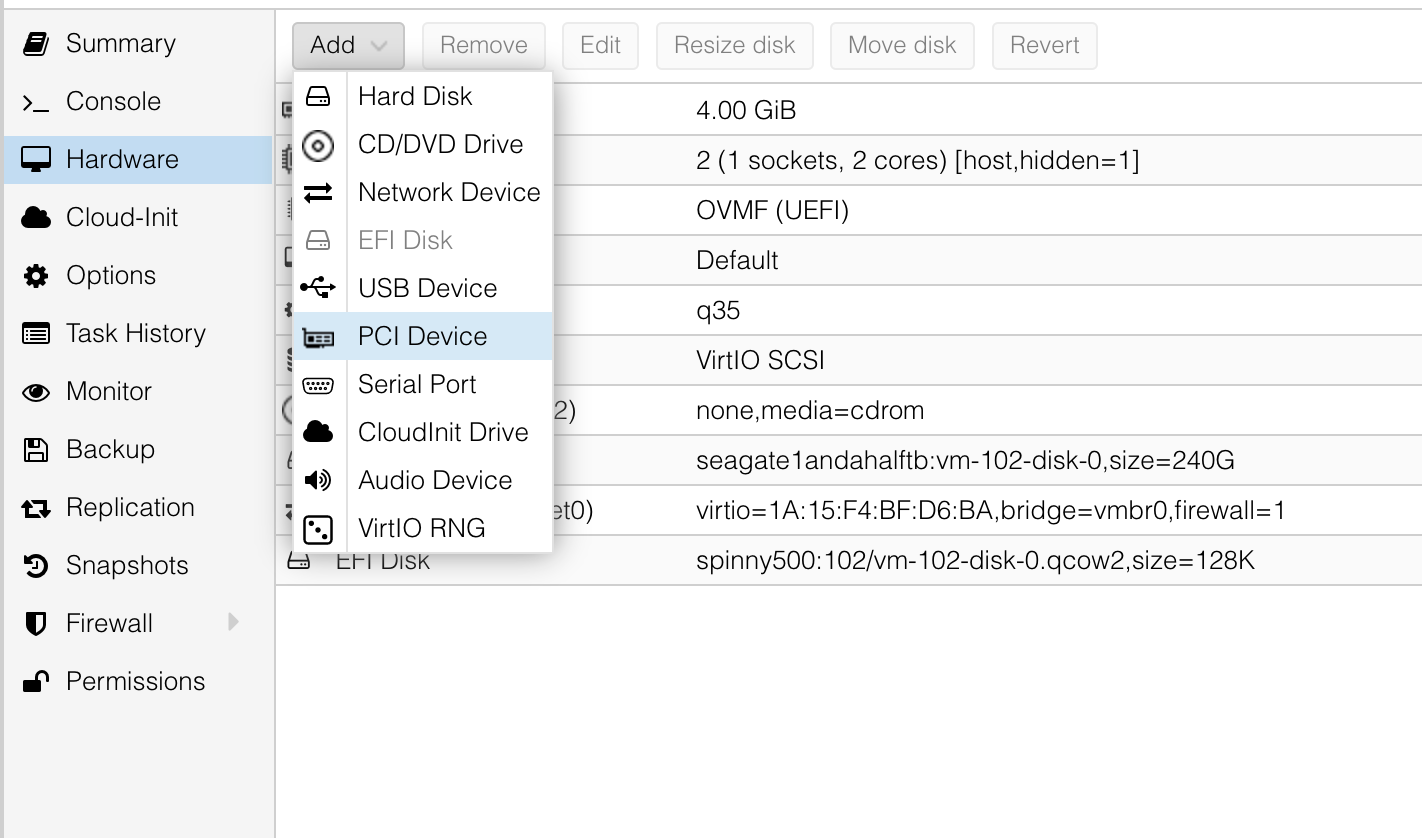
Then you may see 2 devices, one is the video and one is the audio for the GPU. Add both!
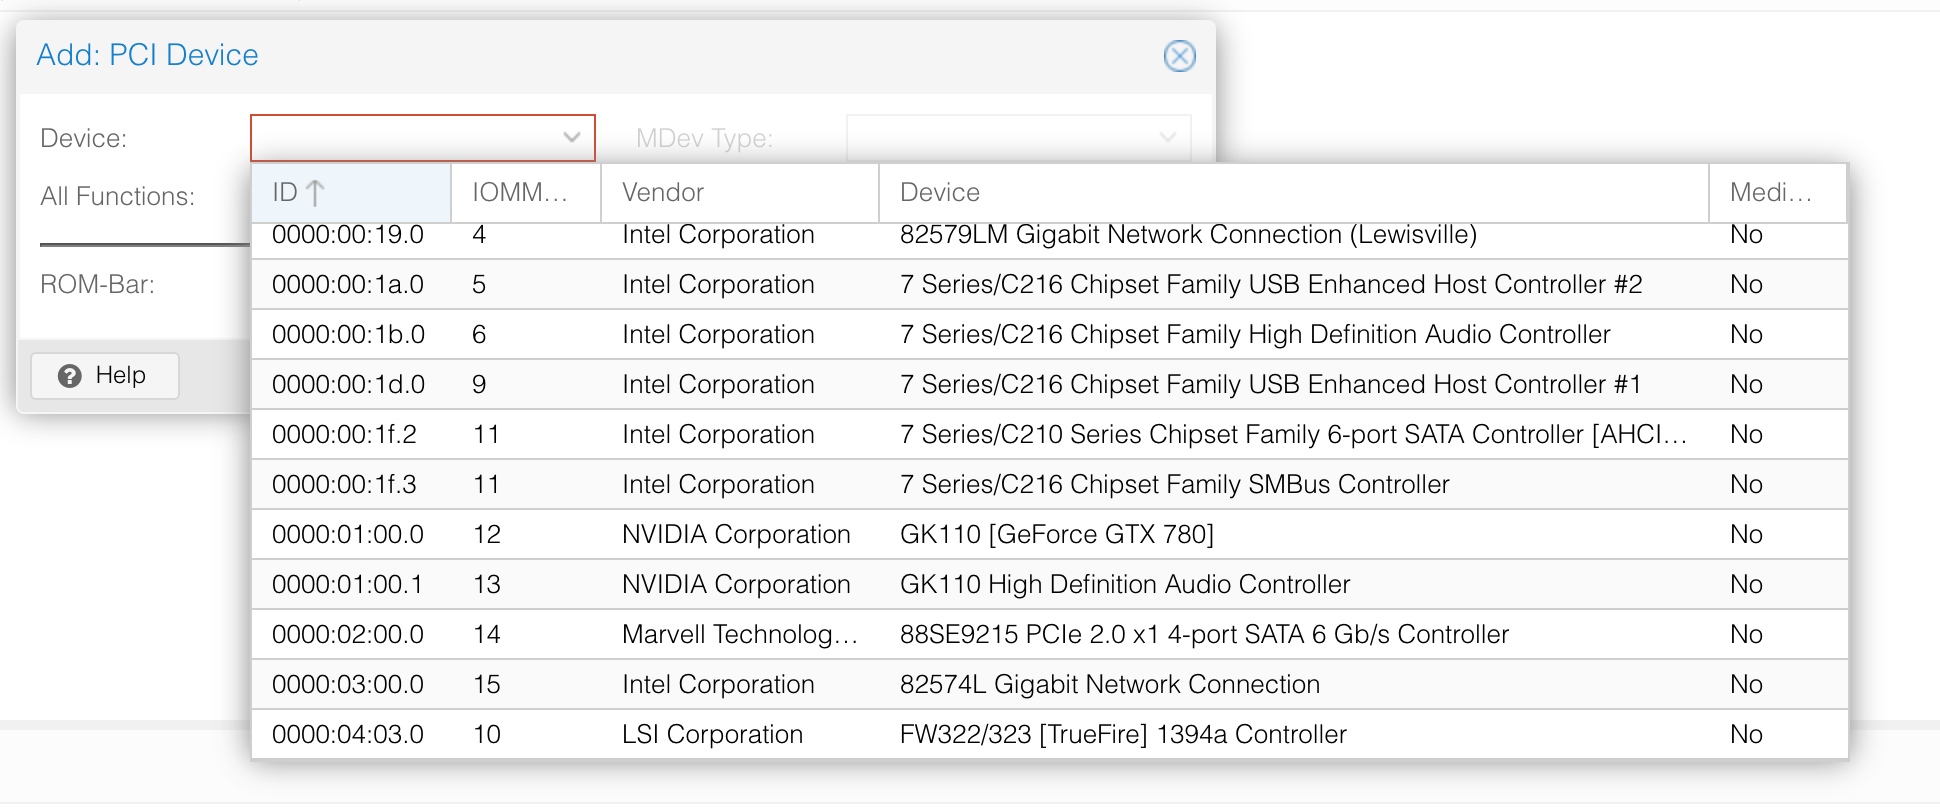
Just leave the default options selected, no need to tick any of the other boxes.

For the GPU to actually be passed through we need to reboot the machine so it picks it up, so reboot the Ubuntu VM.
Now if you log in to the Ubuntu server and run lspci -v, you should see it appear like below
00:10.0 VGA compatible controller: NVIDIA Corporation GK110 [GeForce GTX 780] (rev a1) (prog-if 00 [VGA controller])
	Subsystem: eVga.com. Corp. GK110B [GeForce GTX 780 SC w/ ACX Cooler]
	Physical Slot: 16
	Flags: bus master, fast devsel, latency 0, IRQ 11
	Memory at fd000000 (32-bit, non-prefetchable) [size=16M]
	Memory at f0000000 (64-bit, prefetchable) [size=128M]
	Memory at f8000000 (64-bit, prefetchable) [size=32M]
	I/O ports at e000 [size=128]
	Expansion ROM at fe440000 [virtual] [disabled] [size=128K]
	Capabilities: <access denied>
	Kernel driver in use: nvidia
	Kernel modules: nvidiafb, nouveau, nvidia_drm, nvidia
This is a good sign. Now we need to make some tweaks and install the driver.
We are going to disable the nouveau drivers, these will conflict with nvidia drivers so before installing the nvidia one's let's do the following
sudo bash -c "echo blacklist nouveau > /etc/modprobe.d/blacklist-nvidia-nouveau.conf"
sudo bash -c "echo options nouveau modset=0 >> /etc/modprobe.d/blacklist-nvidia-nouveau.conf"

sudo update-initramfs -u
And now reboot the machine.
Now we are going to download the official Nvidia drivers for your card. Go to nvidia.com/drivers and locate your card. Go through the drop-downs and click search. The next page that loads has a download button, select that, and it will take you to another page. On this page right-click the download button and select copy link.
Let's go back to the Ubuntu VM and download them.
wget https://uk.download.nvidia.com/XFree86/Linux-x86_64/470.82.00/NVIDIA-Linux-x86_64-470.82.00.run

sudo chmod +x NVIDIA-Linux-x86_64-470.82.00.run
Before installing the drivers we need to download some packages so that the drivers can be built.
sudo apt update
sudo apt upgrade
sudo apt install build-essential libglvnd-dev pkg-config
With this done we can install the Nvidia drivers, you will get some prompts and should be fairly simple.
sudo ./NVIDIA-Linux-x86_64-470.82.00.runWhen the installation is complete, run lspci -v and check that kernel driver being used is the nvidia one. Should look like this.
00:10.0 VGA compatible controller: NVIDIA Corporation GK110 [GeForce GTX 780] (rev a1) (prog-if 00 [VGA controller])
Subsystem: eVga.com. Corp. GK110B [GeForce GTX 780 SC w/ ACX Cooler]
Physical Slot: 16
Flags: bus master, fast devsel, latency 0, IRQ 11
Memory at fd000000 (32-bit, non-prefetchable) [size=16M]
Memory at f0000000 (64-bit, prefetchable) [size=128M]
Memory at f8000000 (64-bit, prefetchable) [size=32M]
I/O ports at e000 [size=128]
Expansion ROM at fe440000 [virtual] [disabled] [size=128K]
Capabilities: <access denied>
Kernel driver in use: nvidia
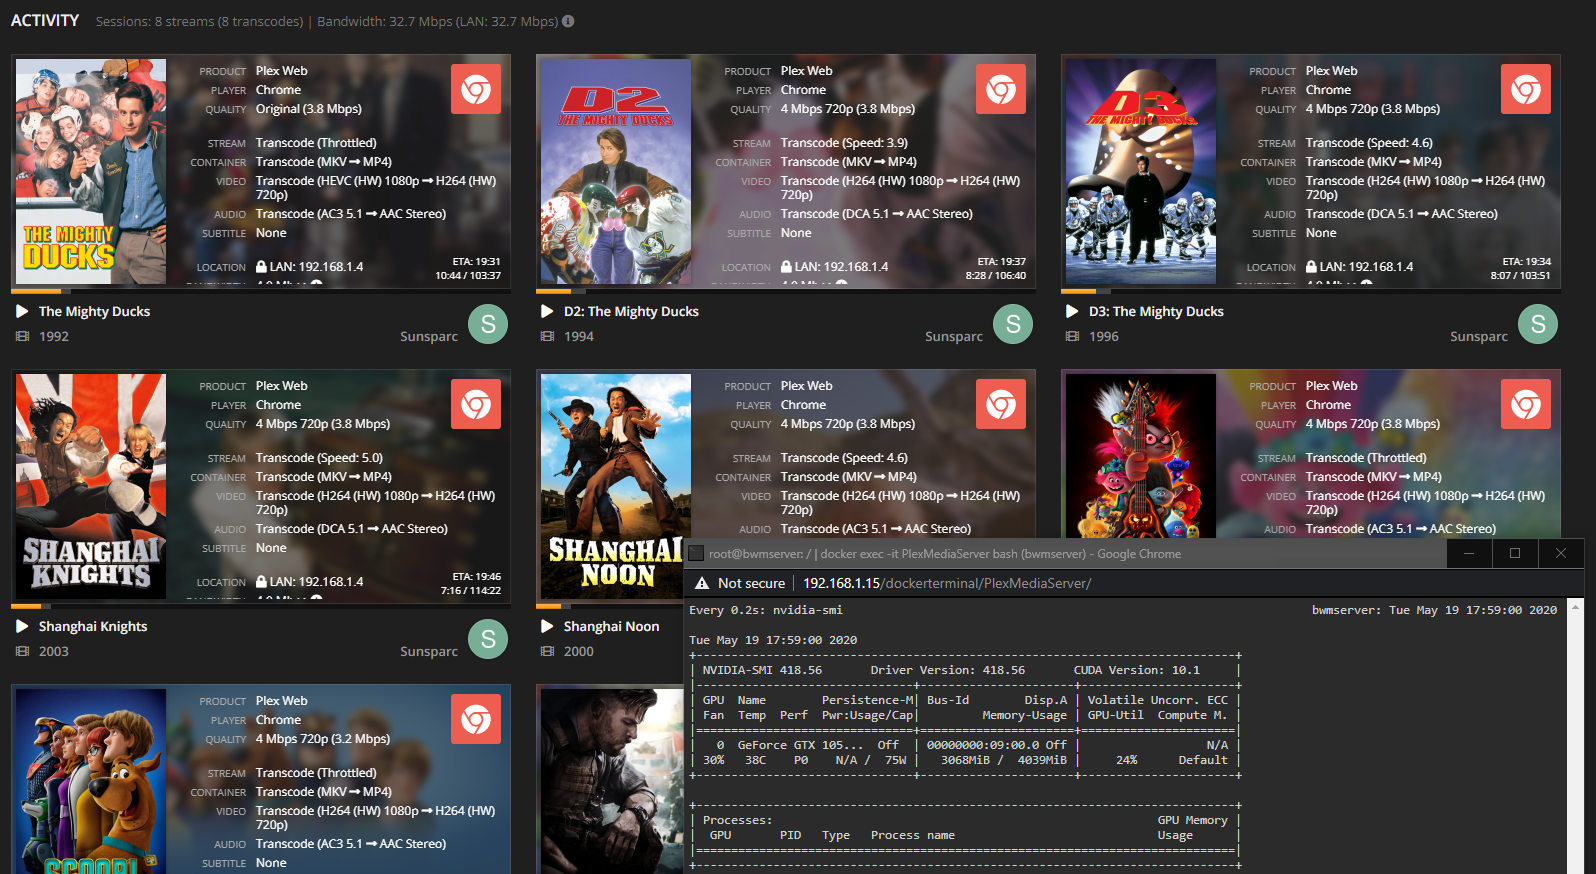
Kernel modules: nvidiafb, nouveau, nvidia_drm, nvidiaYou can now see if the card is active and working by running nvidia-smi
You may get an error, if so then SSH back into your proxmox host and edit the VM config file. Add this line.
sudo vim /etc/pve/qemu-server/102.confcpu: host,hidden=1Save the file and exit, reboot the Ubuntu VM once more and now the command nvidia-smi should return something like so
nvidia-smi
Fri Nov  5 10:31:59 2021
+-----------------------------------------------------------------------------+
| NVIDIA-SMI 470.82.00    Driver Version: 470.82.00    CUDA Version: 11.4     |
|-------------------------------+----------------------+----------------------+
| GPU  Name        Persistence-M| Bus-Id        Disp.A | Volatile Uncorr. ECC |
| Fan  Temp  Perf  Pwr:Usage/Cap|         Memory-Usage | GPU-Util  Compute M. |
|                               |                      |               MIG M. |
|===============================+======================+======================|
|   0  NVIDIA GeForce ...  Off  | 00000000:00:10.0 N/A |                  N/A |
|  0%   40C    P0    N/A /  N/A |      0MiB /  3022MiB |     N/A      Default |
|                               |                      |                  N/A |
+-------------------------------+----------------------+----------------------+

+-----------------------------------------------------------------------------+
| Processes:                                                                  |
|  GPU   GI   CI        PID   Type   Process name                  GPU Memory |
|        ID   ID                                                   Usage      |
|=============================================================================|
|  No running processes found                                                 |
+-----------------------------------------------------------------------------+
This means it is working well.
The next step is get it running in containers, for this you need to install the nvidia container toolkit — https://docs.nvidia.com/datacenter/cloud-native/container-toolkit/install-guide.html#docker
The guide there is spot on, but I will list the commands here so you do not have to change tabs.
distribution=$(. /etc/os-release;echo $ID$VERSION_ID) \
   && curl -s -L https://nvidia.github.io/nvidia-docker/gpgkey | sudo apt-key add - \
   && curl -s -L https://nvidia.github.io/nvidia-docker/$distribution/nvidia-docker.list | sudo tee /etc/apt/sources.list.d/nvidia-docker.list


sudo apt-get update

sudo apt-get install -y nvidia-docker2

sudo systemctl restart docker
And if that went well you should be able to spin up a container and output the nvidia-smi via the container like so
sudo docker run --rm --gpus all nvidia/cuda:11.0-base nvidia-smi
Unable to find image 'nvidia/cuda:11.0-base' locally
11.0-base: Pulling from nvidia/cuda
54ee1f796a1e: Already exists
f7bfea53ad12: Already exists
46d371e02073: Already exists
b66c17bbf772: Already exists
3642f1a6dfb3: Pull complete
e5ce55b8b4b9: Pull complete
155bc0332b0a: Pull complete
Digest: sha256:774ca3d612de15213102c2dbbba55df44dc5cf9870ca2be6c6e9c627fa63d67a
Status: Downloaded newer image for nvidia/cuda:11.0-base
Fri Nov  5 09:17:09 2021
+-----------------------------------------------------------------------------+
| NVIDIA-SMI 470.82.00    Driver Version: 470.82.00    CUDA Version: 11.4     |
|-------------------------------+----------------------+----------------------+
| GPU  Name        Persistence-M| Bus-Id        Disp.A | Volatile Uncorr. ECC |
| Fan  Temp  Perf  Pwr:Usage/Cap|         Memory-Usage | GPU-Util  Compute M. |
|                               |                      |               MIG M. |
|===============================+======================+======================|
|   0  NVIDIA GeForce ...  Off  | 00000000:00:10.0 N/A |                  N/A |
|  0%   41C    P0    N/A /  N/A |      0MiB /  3022MiB |     N/A      Default |
|                               |                      |                  N/A |
+-------------------------------+----------------------+----------------------+

+-----------------------------------------------------------------------------+
| Processes:                                                                  |
|  GPU   GI   CI        PID   Type   Process name                  GPU Memory |
|        ID   ID                                                   Usage      |
|=============================================================================|
|  No running processes found                                                 |
+-----------------------------------------------------------------------------+
So we have passed through the GPU, tweaked some stuff and installed both nvidia drivers and the nvidia container tool kit. Now lets move on to getting plex inside docker to use it.
First check your docker daemon file to see if the installation has prepopulated it.
cat /etc/docker/daemon.json

{
    "runtimes": {
        "nvidia": {
            "path": "nvidia-container-runtime",
            "runtimeArgs": []
        }
    }
}
If it looks like this you are golden.
Now there is one step left for a docker container to use the GPU. It is to add the runtime from the daemon to the actual docker run command or in my case compose.
It will look like so if you were to be using plex
  plex:
    image: linuxserver/plex
    container_name: plex
    network_mode: host
    environment:
      - PUID=1000
      - PGID=1000
      - VERSION=docker
      - UMASK=022 #optional
      - PLEX_CLAIM=claim-abcdefghijklmnop12345
      - NVIDIA_VISIBLE_DEVICES=all
    runtime: nvidia
    volumes:
     - ./media/plex/config:/config
      - ./media/:/all_media
    devices:
      - /dev/dri:/dev/dri
    restart: unless-stopped
And really that is it. Hopefully this has helped a little. From my experience one guide alone is not enough as there is a lot of different quirky issues that may happen, but this should get you there 100% of the way or at least very close.